Start Your Journey with Svelte 5: A Beginner's Handbook
Steps to Create a SvelteKit Project with the New CLI

What Makes Svelte 5 Different?
Svelte 5 is a compiler-based framework that takes a unique approach to web development. Unlike frameworks like React and Vue that use a Virtual DOM to manage reactivity, Svelte compiles your code to vanilla JavaScript during build time. This approach has several benefits:
Performance: No Virtual DOM means less runtime overhead and faster updates.
Smaller Bundle Size: Svelte only includes the code that your app actually needs, leading to leaner bundle sizes.
Easier Reactivity: Svelte's reactivity model is simpler, using reactive declarations and
$effectrunes, which we’ll explore in depth in this series.
Key Features of Svelte 5:
- Runes for Fine-Grained Reactivity: Svelte 5 introduces "runes," a signal-powered reactivity API that provides explicit control over application state. Key runes include
$statefor declaring reactive variables,$derivedfor creating reactive values based on other states, and$effectfor executing side effects in response to state changes
Due to the reactive nature of Svelte I haven’t found too many use cases where the $effect rune is really needed.
Snippets for Reusable Markup: Replacing the previous slot system, snippets allow developers to define reusable blocks of markup and logic within components. This promotes code organization and reduces redundancy, enhancing component composition.
Enhanced Compiler Performance: Svelte 5's compiler has been overhauled to generate more optimized JavaScript code, resulting in smaller bundle sizes and faster runtime performance. This improvement leverages Svelte's compiler-first approach to eliminate unnecessary overhead.
Native TypeScript Support: Svelte 5 offers native TypeScript support, allowing developers to use TypeScript annotations directly within Svelte components. This integration streamlines development workflows and enhances type safety without the need for additional tooling.
// Just add a lang prop to the script and magic just happens
<script lang="ts">
  //...code
</script>
- Simplified Event Handling: Event handling in Svelte 5 has been refined to reduce boilerplate and increase flexibility. Event handlers are now treated as properties, aligning them with other component properties and simplifying the syntax for attaching event listeners.
<script lang="ts">
  import WaterPump from './WaterPump.svelte';

  let size = $state(10);
  let bloomed = $state(false);

  const resetPlant = () => {
    size = 10;
    bloomed = false;
  }
</script>

<WaterPump
  water={(amount) => {
    size += amount;
    if (size > 50) bloomed = true;
  }}
  dry={(amount) => {
    if (size > 0) size -= amount;
  }}
/>

{#if bloomed}
  <button onclick={resetPlant}>New Plant</button>
  <span class="flower">🌸</span>
{:else}
  <span class="plant" style="font-size: {0.2 * size}em">
    🌱
  </span>
{/if}
<script lang="ts">
  let { water, dry } = $props();
  let amount = $state(5);
</script>

<div>
  <button onclick={() => water(amount)}>💧 Water</button>
  <button onclick={() => dry(amount)}>☀️ Dry</button>

  <div>
    <button onclick={() => amount--} disabled={amount <= 1}>-</button>
    <span>Water Amount: {amount}</span>
    <button onclick={() => amount++}>+</button>
  </div>
</div>
Benefits of Vite in SvelteKit
SvelteKit is built on top of Vite, so we get to tap into its extensive and ever-evolving ecosystem. That means any tool compatible with Vite integrates seamlessly with SvelteKit, giving us a wealth of options to enhance our development experience with minimal setup.
Here are some practical examples:
Vitest for quick and effective unit and integration testing
Storybook to streamline component-driven development
"@sveltejs/enhanced-img" for static image optimization without extra hassle
On top of that, SvelteKit leverages Vite's optimized development server and blazing-fast hot module replacement (HMR). This setup keeps our development workflows smooth and responsive, allowing us to see changes instantly and stay focused on building.
Setting Up Your Environment
To get started, you need to install Node.js (version 20 or higher is recommended) and set up a SvelteKit project.
Step-by-Step Setup
The Svelte team has shipped a great CLI tool to generate a starter boilerplate project from scratch 🤩
Install SvelteKit: Run the following command to create a new SvelteKit project:
npx sv create my-appChoose any of the three options provided, I always pick the minimal for starting new projects, full-time typescript, prettier, eslint, tailwindcss and many other tools that come out-of-the-box when setting up a new svelte app. Below I left the ones I usually pick:
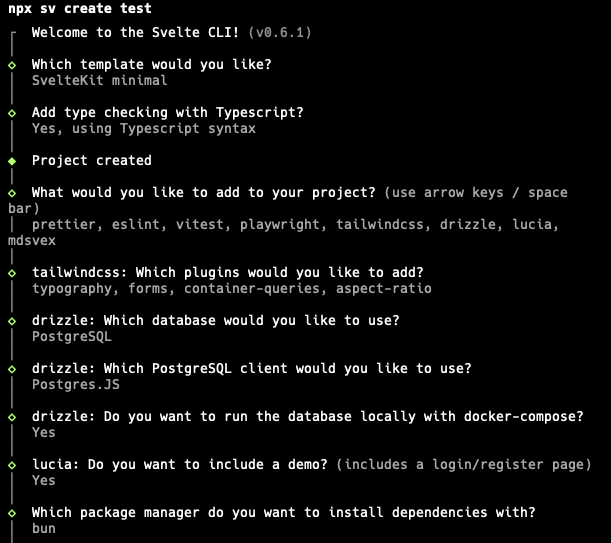
One amazing thing is that it allows you to start up a local docker container database within the application, fully integrated with drizzle!
Spin up your database with the following command:
bun run db:start
As you may see I’m using bun, lately I’ve been more inclined to it, give it a try!
Project Structure Overview
SvelteKit uses a file-based routing system, where your file structure directly determines the routes of your application. This is the scaffold of the project within the above picks from the CLI:
TEST/
├── e2e/                       # End-to-end tests (e.g., Playwright)
├── node_modules/              # Dependencies
├── src/
│   ├── lib/                   # Library for utilities, stores, reusable functions/components
│   ├── server/                # Server-specific logic
│   │   ├── db/                # Database-related files (schema, auth)
│   │   │   ├── index.ts
│   │   │   └── schema.ts
│   │   └── auth.ts            # Authentication handling (e.g., Lucia)
│   ├── routes/                # File-based routing for SvelteKit
│   │   ├── demo/              # Example route or feature-specific routes
│   │   └── lucia/
│   │       └── login/         # Authentication routes or specific modules
│   │       ├── +page.svelte
│   │       ├── +page.server.ts
│   │       ├── +layout.svelte
│   │       └── +page.svelte
│   ├── app.css                # Global CSS
│   ├── app.d.ts               # TypeScript declarations for SvelteKit
│   ├── app.html               # Main HTML template for the app
│   ├── demo.spec.ts           # Component or page-specific tests
│   └── hooks.server.ts        # Server hooks for SvelteKit (auth, session handling)
├── static/                    # Static assets (images, icons, etc.)
├── .env                       # Environment variables
├── .env.example               # Example environment variables file
├── .gitignore                 # Git ignore file
├── .npmrc                     # npm configuration file
├── .prettierignore            # Files ignored by Prettier
├── .prettierrc                # Prettier configuration
├── bun.lockb                  # Bun package manager lock file
├── docker-compose.yml         # Docker configuration
├── drizzle.config.ts          # Drizzle ORM configuration
├── eslint.config.js           # ESLint configuration
├── package.json               # Project metadata and dependencies
├── playwright.config.ts       # Playwright configuration for end-to-end testing
├── postcss.config.js          # PostCSS configuration for CSS processing
├── README.md                  # Project documentation
├── svelte.config.js           # SvelteKit configuration
├── tailwind.config.ts         # Tailwind CSS configuration
├── tsconfig.json              # TypeScript configuration
└── vite.config.ts             # Vite configuration
Summary and Next Steps
That’s all folks!
In Part 1, you’ve learned:
What differences Svelte 5 from other frameworks
Key features that will streamline your workflow
How to set up a SvelteKit project and understand its file-based routing structure.
Next, in Part 2, we’ll dive into Svelte’s reactivity model and explore more on the runes concept.
About the author
- I’m a software engineer, product builder, and founder of Lynsoft with more than 15 years of experience creating custom digital products. I work across frontend architecture, backend systems, SaaS platforms, integrations, automation, and applied AI. On this blog, I share practical lessons from building real products, making technical decisions, scaling software, and turning complex business problems into reliable systems.
Comments
Join the discussionNo comments yet. Be the first to comment.
Mastering Svelte 5
In this series, I will dive deep into Svelte 5, exploring its unique reactivity model, the powerful $effect rune, and how it simplifies modern web development.


