My baseline recipe for hardening a fresh VPS
A practical, opinionated baseline for securing fresh Debian/Ubuntu VPS servers before deploying real apps.
Every time I spin up a new VPS, I usually start with the same thought:
“I just need this server for one app. I’ll secure it properly later.”
And that is exactly where problems begin.
A fresh VPS is convenient, cheap, and fast to create. But by default, it is also too easy to leave exposed. SSH is usually open, the root user may still be accessible, firewall rules are often too permissive, logs are not always durable, and basic security updates depend on you remembering to apply them.
After working with my own VPS servers for self-hosted apps, Docker deployments, Dokploy, Coolify, experiments, and production-ish side projects, I started to repeat the same hardening checklist over and over again.
So I decided to turn that checklist into my own baseline recipe.
Not a perfect security solution. Not a replacement for a real audit. Just a practical, opinionated starting point that makes a new Debian/Ubuntu server safer from day one.
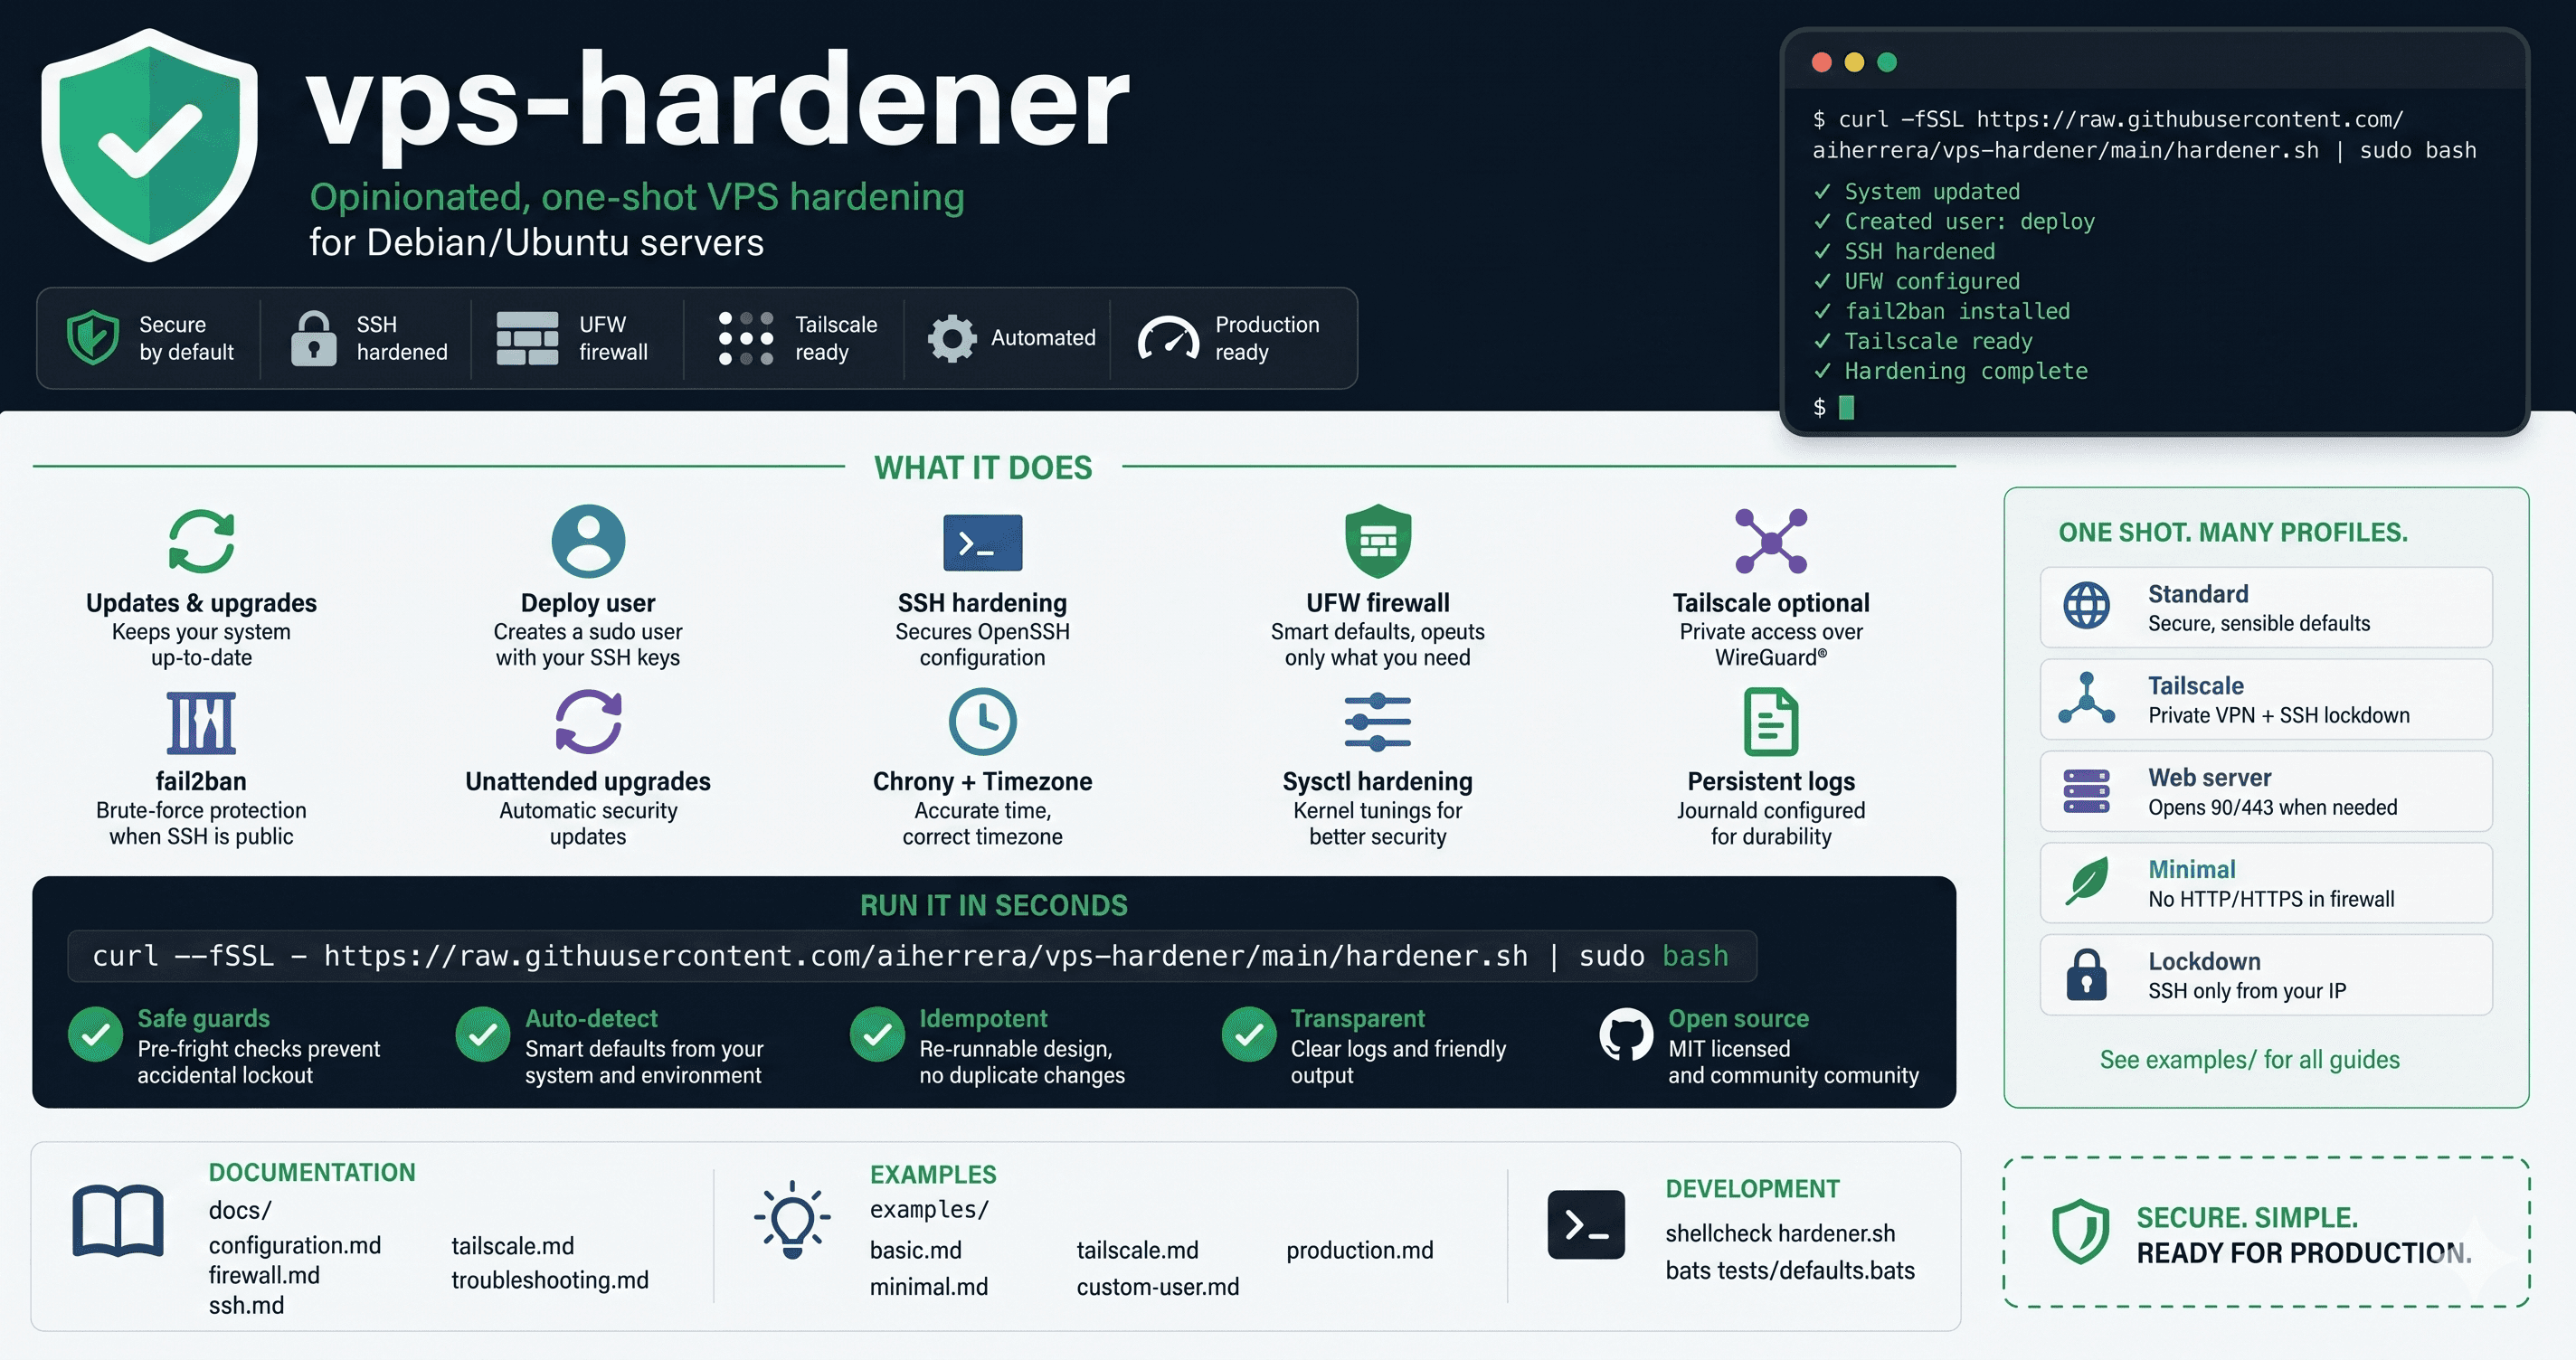
That recipe became vps-hardener.
The goal: a protected baseline from zero
The goal is not to make a VPS “impossible to hack.” That is not realistic.
The goal is simpler:
When I create a new server, I want to reduce the most common risks immediately:
default SSH exposure
root login
password-based authentication
missing firewall rules
missing automatic security updates
no brute-force protection
no private admin network
no persistent logs
weak kernel/network defaults
Most of these things are not complex. The problem is that they are easy to forget when you are moving fast.
A baseline script helps because it turns a manual checklist into a repeatable setup.
Why I focus on Debian/Ubuntu VPS servers
Most of my VPS work happens on Debian or Ubuntu-based servers.
They are common, well documented, supported by most providers, and compatible with the tools I usually use: Docker, Dokploy, Coolify, Tailscale, UFW, fail2ban, unattended-upgrades, and Chrony.
The first version of the script is intentionally focused there. Supporting every Linux distribution would make the tool more complex, and I wanted the first version to stay boring and reliable.
That is also why the script is opinionated.
It does not try to support every possible setup. It tries to cover the setup I actually use when I want to start a VPS safely.
1. System update and base packages
The first step is simple: update the server.
A fresh VPS image can still have outdated packages. Before installing anything else, I want the system to be current.
The script runs the usual update and upgrade flow, then installs common admin tools I normally want anyway: curl, wget, git, jq, htop, unzip, networking tools, and similar utilities.
The upside is practical: after the script finishes, the server is immediately more usable for debugging and administration.
This is not glamorous, but it matters. A secure server that is painful to inspect is not fun to operate.
2. A dedicated deploy user
One of the first things I want on a new VPS is a non-root user.
The script creates a deploy user by default, adds it to sudo, and copies available SSH keys into that user.
Why?
Because I do not want to operate day-to-day as root.
Using a dedicated user gives me a cleaner operational model:
root login can be disabled
deployments can happen through a predictable user
SSH access is easier to reason about
automation can target the same username across servers
The script also supports overriding the user with DEPLOY_USER, or using DEPLOY_USER=auto if you want to reuse the current sudo user.
The important part is that the server should not depend on direct root SSH access.
3. SSH hardening
SSH is usually the front door of the server.
So I want the basics locked down early:
disable root login
disable password authentication
require public key authentication
reduce authentication attempts
disable X11 forwarding
keep the SSH config isolated in a dedicated hardening file
Instead of editing the main SSH config directly, the script writes hardening rules into:
/etc/ssh/sshd_config.d/99-vps-hardening.conf
That makes the change easier to review and easier to remove if needed.
The biggest upside here is reducing brute-force risk. If password authentication is disabled and only SSH keys work, automated login attempts become much less useful.
But there is one important safety rule:
The script requires SSH keys to exist before continuing.
That is intentional. A hardening script should not lock you out of your own server.
4. UFW firewall with safer defaults
A new VPS should not expose every service by accident.
The script configures UFW with:
default deny incoming
default allow outgoing
Then it opens only what is needed.
By default, SSH remains available unless you explicitly configure a more locked-down setup. For web servers, ports 80 and 443 can be allowed, but the script also tries to avoid opening them unnecessarily when no web service is listening.
This is one of the parts I care about most.
A lot of self-hosted setups accidentally expose databases, Redis, admin panels, or internal services. A firewall baseline helps reduce that risk.
For example, Postgres and Redis should usually not be publicly reachable from the internet. They should live inside Docker networks, private networks, or trusted access paths.
The firewall is not the only layer of security, but it is a very useful guardrail.
5. Optional Tailscale for private access
For admin access, I like using Tailscale.
Tailscale gives me a private network between my machines and servers without having to manually manage VPN servers.
In this setup, Tailscale can be used to make SSH private. Instead of exposing SSH publicly to the internet, the server can allow SSH only through the tailscale0 interface.
That gives a cleaner model:
Public internet:
  80/443 only when needed

Private Tailscale network:
  SSH
  admin access
  internal server-to-server communication
The script supports this through TAILSCALE_AUTHKEY and USE_TAILSCALE.
One design choice I added is auto-detection:
If you provide a TAILSCALE_AUTHKEY, the script assumes you want Tailscale enabled.
And if the Tailscale join succeeds, public SSH can be closed automatically unless you explicitly keep it open.
That makes the secure path easier.
6. fail2ban when public SSH remains open
If public SSH remains open, I want fail2ban installed.
fail2ban watches authentication logs and bans repeated failed login attempts.
It is not magic, and it does not replace SSH keys or firewall rules, but it is a useful extra layer when a server still accepts SSH traffic from the public internet.
In my baseline, fail2ban is especially useful for setups where I am not using Tailscale yet, or where public SSH needs to remain available temporarily.
The upside is simple: fewer repeated brute-force attempts hitting the SSH service over and over.
7. unattended-upgrades for security updates
I do not want every small security update to depend on my memory.
That is why I enable unattended-upgrades.
For a VPS that runs long-lived services, automatic security updates are a practical baseline. They help close known vulnerabilities faster, especially for system packages.
Of course, this is still not a replacement for maintenance. You still need to monitor your server, update Docker images, patch application dependencies, and reboot when required.
But enabling unattended security updates is a good default.
It reduces the chance that a forgotten VPS stays vulnerable for weeks or months.
8. Chrony and timezone
Time matters more than people think.
Logs, TLS, distributed systems, cron jobs, database timestamps, monitoring, and debugging all depend on correct time.
That is why the script installs Chrony and sets a predictable timezone.
By default, I use UTC because it is easier to reason about across servers and deployments. But the timezone can be overridden with TIMEZONE.
This is one of those small decisions that prevents confusion later.
When something breaks, having consistent timestamps helps a lot.
9. sysctl hardening
The script also applies a small set of kernel/network hardening defaults using sysctl.
The goal is not to tune the kernel aggressively. The goal is to apply sensible security-oriented defaults, such as:
ignore ICMP redirects
disable source routing
enable SYN flood protection
log suspicious packets
restrict kernel pointer exposure
restrict dmesg access
restrict ptrace behavior
These settings are not a silver bullet, but they improve the default posture of the server.
The key here is balance.
I do not want a script that applies hundreds of obscure kernel settings and then breaks normal workloads. I want a small, understandable baseline that is safe for common VPS usage.
10. Persistent journald logs
By default, logs can be less durable than you expect.
For troubleshooting, I want system logs to survive reboots.
So the script enables persistent journald logs by creating:
/var/log/journal
Then it restarts systemd-journald.
The upside is simple: when something goes wrong, you have a better chance of seeing what happened before the reboot.
This is especially useful when debugging SSH, Docker, firewall behavior, system crashes, or service failures.
Profiles and auto-detection
One thing I wanted to avoid was forcing people to remember a large set of environment variables.
So the script supports profiles and auto-detection.
Examples:
PROFILE=webfor a web server setupPROFILE=minimalto avoid opening HTTP/HTTPSPROFILE=lockdownto restrict SSH to your current IPTAILSCALE_AUTHKEYto automatically enable Tailscale
The priority is:
explicit environment variable > profile > auto-detection
That means you can use a simple command most of the time, but still override behavior when needed.
For example:
curl -fsSL https://raw.githubusercontent.com/aiherrera/vps-hardener/main/hardener.sh | sudo bash
Or with Tailscale:
curl -fsSL https://raw.githubusercontent.com/aiherrera/vps-hardener/main/hardener.sh | sudo TAILSCALE_AUTHKEY=tskey-... bash
Or for a web server:
curl -fsSL https://raw.githubusercontent.com/aiherrera/vps-hardener/main/hardener.sh | sudo PROFILE=web bash
The idea is to make the safe path easy, but not completely rigid.
What this does not solve
I want to be clear about this part.
A VPS hardening script does not make a server fully secure forever.
It does not replace:
backups
monitoring
application security
secret management
database hardening
Docker image updates
dependency updates
provider-level firewall rules
real incident response
regular audits
It also does not protect you if you expose a database publicly with weak credentials, run untrusted containers, leak environment variables, or deploy vulnerable applications.
The script is only the baseline.
But a baseline matters.
Because starting from a better default reduces the number of obvious mistakes.
Why I built the repo
I built vps-hardener because I wanted my own repeatable server setup.
Every time I created a new VPS, I had to remember the same things:
create the deploy user
copy SSH keys
disable root login
disable password login
configure UFW
decide whether to use Tailscale
install fail2ban
enable unattended upgrades
configure time sync
persist logs
apply basic sysctl hardening
Doing this manually once is fine.
Doing it repeatedly is annoying.
Forgetting one step is risky.
So I turned it into an open-source script.
The repo is here:
https://github.com/aiherrera/vps-hardener
I also created a small page with docs and a script builder so you can pick the right setup for your use case:
https://harden.aiherrera.com
The script builder is useful because not every VPS needs the same setup. Some are web servers. Some are private workers. Some should use Tailscale. Some should not expose HTTP or HTTPS at all.
Instead of manually editing environment variables, you can choose the setup and generate the right command.
Final thoughts
Server hardening does not need to be complicated to be useful.
The best baseline is the one you actually apply every time.
For me, that means something simple, repeatable, and opinionated enough to prevent the most common mistakes.
vps-hardener is my current recipe for that.
It is not perfect, and I will keep improving it as I use it more.
But now, when I spin up a new VPS, I no longer start from a blank checklist.
I start from a safer baseline.