The perfect starter template for React Native: Expo, Tailwinds(Nativewind), React Native Paper UI and Prettier
Tailored environment configuration for RN Expo projects

Introduction
Setting up a new React Native project can be a daunting task, especially when it comes to configuring the tools and libraries that you need for a smooth and efficient workflow. In this guide, we'll show you how to configure a React Native project with Expo, Tailwind, React Native Paper, and Prettier. Expo will provide a powerful development environment, Tailwind will give you a flexible and easy-to-use styling solution, React Native Paper will provide a comprehensive set of UI components, and Prettier will help you maintain consistent code formatting. By the end of this guide, you'll have a fully configured project that's ready for success.
In this post, I'll show you how I configured my current template starter for my projects. I'll let the link to the repository at the end of this article!

Prerequisites
There are some installments we need to have to start with this journey as stated on the official Expo website:
Watchman is only for Mac/Linux users
They recommend (and so do I 😎) using the VSCode editor & the VSCode Expo extension.
Also, it is recommended to install the Expo GO native application for your phone. I'll let you the link for iPhone & Android.
When you run
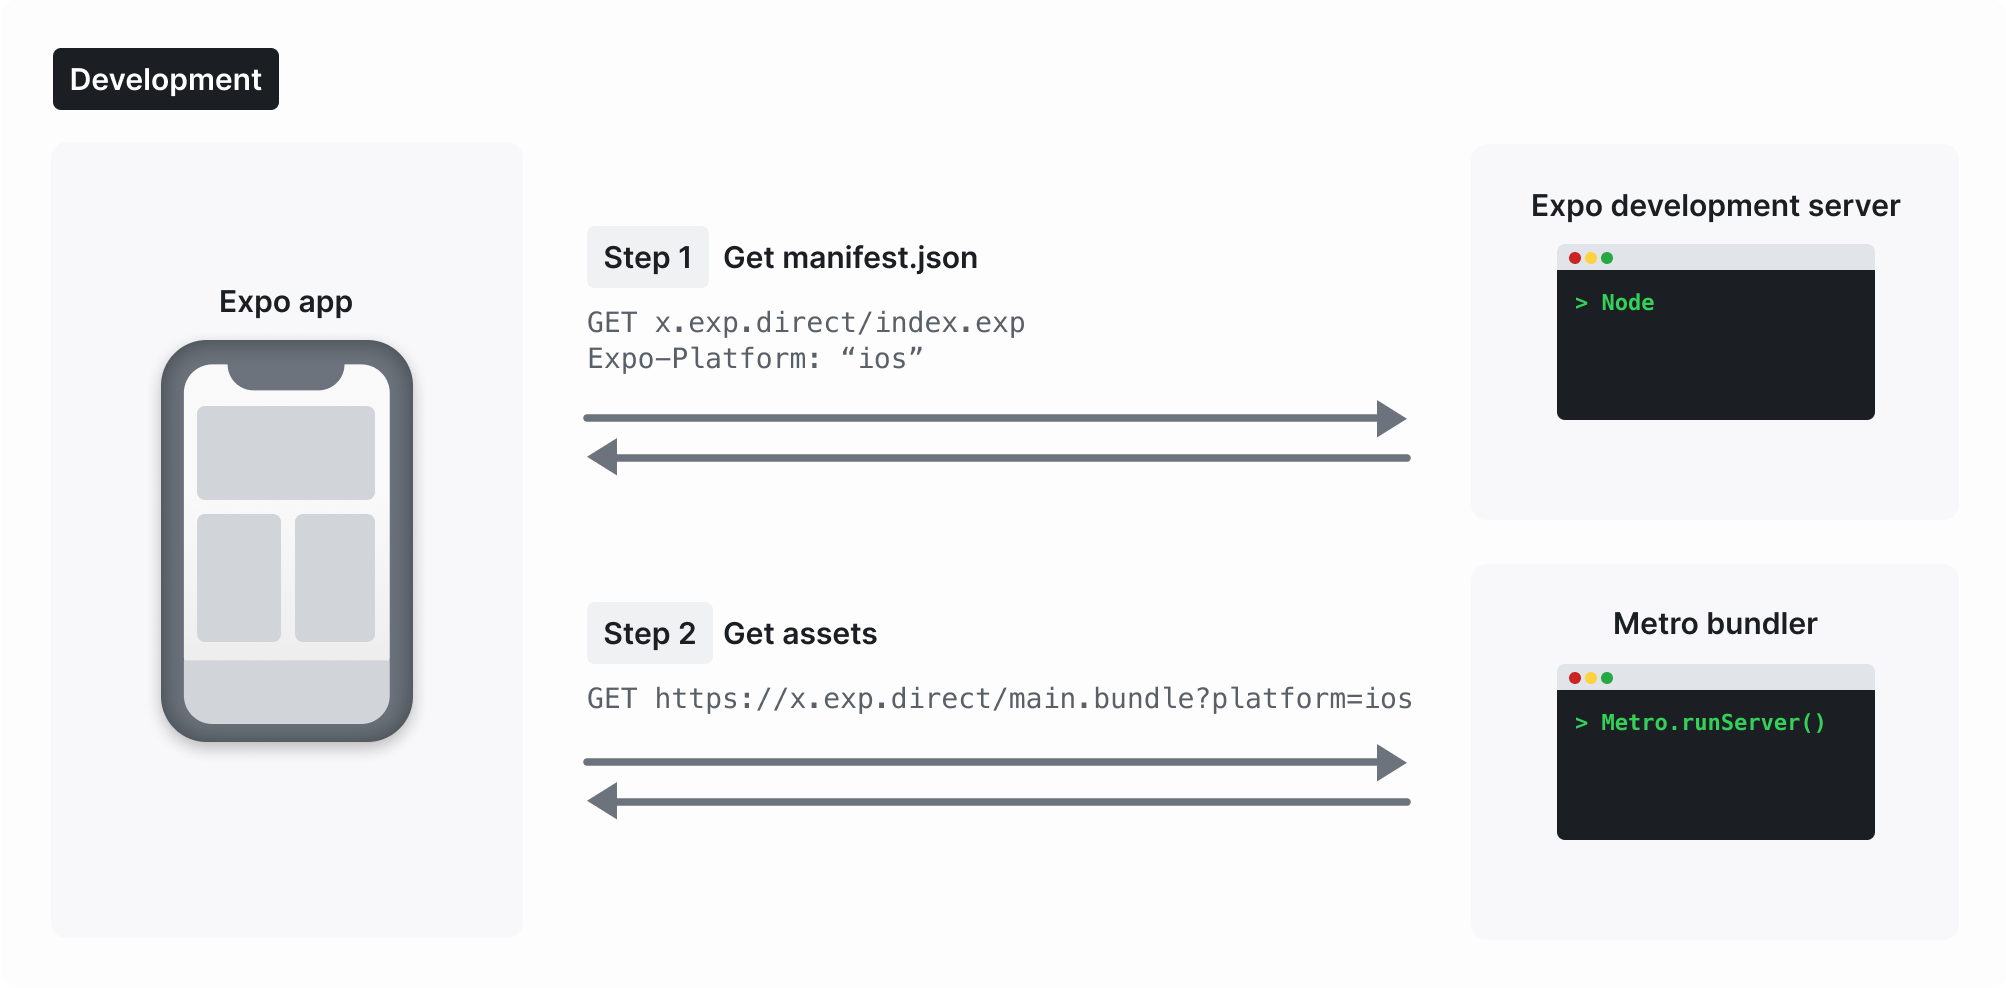
npx expo startin your project, Expo CLI starts a development server and generates a QR code. You can then open the Expo Go app on your device and scan the QR code to connect to the dev server.The dev server returns a JSON manifest file that describes the project. Expo Go uses this manifest to download the JavaScript bundle and any assets required to run the project. Then, the JavaScript engine executes this JavaScript bundle to render the React Native app.
Creating a new project
Now, let's create a brand new project:
# create a new project
npx create-expo-app my-app
# navigate to the new folder
cd my-app
# start the development server
yarn expo start
After the latest command, you should get this a log like this one in your console:

Now you can link your development environment with your Expo Go app by clicking on the scan the QR code option inside the app.
Setting up Tailwinds CSS with Nativewind
For the integration of Tailwinds inside our RN Expo project we'll be using the Nativewind library.
NativeWinduses Tailwind CSS as a high-level scripting language to create a universal design system.
So, let's install it!
yarn add nativewind
yarn add --dev tailwindcss
Then, you should configure your tailwind config file as per your requirements:
// tailwind.config.js

module.exports = {
- content: [],
+ content: ["./App.{js,jsx,ts,tsx}", "./<custom directory>/**/*.{js,jsx,ts,tsx}"],
  theme: {
    extend: {},
  },
  plugins: [],
}
and add the Nativewind plugin in the babel config file too:
// babel.config.js
module.exports = function (api) {
  api.cache(true);
  return {
    presets: ["babel-preset-expo"],
+   plugins: ["nativewind/babel"],
  };
};
With this you'll be good to go:
import { StatusBar } from 'expo-status-bar';
import React from 'react';
- import { StyleSheet, Text, View } from 'react-native';
+ import { Text, View } from 'react-native';

export default function App() {
  return (
-   <View style={styles.container}>
+   <View className="flex-1 items-center justify-center bg-white">
-     <Text>Open up App.js to start working on your app!</Text>
+     <Text>Tailwinds is up now!</Text>
      <StatusBar style="auto" />
    </View>
  );
}

- const styles = StyleSheet.create({
-   container: {
-     flex: 1,
-     backgroundColor: '#fff',
-     alignItems: 'center',
-     justifyContent: 'center',
-   },
- });
Setting up React Native Paper UI
To add RN Paper UI to our project just follow these steps:
yarn add react-native-paper
# From v5 there is a need to install react-native-safe-area-context for handling safe area.
yarn add react-native-safe-area-context
# MaterialCommunityIcons icon pack
yarn add react-native-vector-icons
Now, let's add the plugin to the Babel config file:
// babel.config.js
module.exports = function (api) {
  api.cache(true)
  return {
    presets: ['babel-preset-expo'],
-   plugins: ['nativewind/babel'],
+   plugins: ['nativewind/babel', 'react-native-paper/babel'],
  }
}
That's it, from here let's just configure inside our layout for example:
...
+ import { Provider as PaperProvider } from 'react-native-paper'

function RootLayoutNav() {
  const colorScheme = useColorScheme()

  return (
    <>
+     <PaperProvider>
        <ThemeProvider value={DefaultTheme}>
          <Stack>
            <Stack.Screen name='(tabs)' />
            <Stack.Screen name='modal' }} />
          </Stack>
        </ThemeProvider>
+     </PaperProvider>
    </>
  )
}
Example of use:
import * as React from 'react';
import { ActivityIndicator, MD2Colors } from 'react-native-paper';

const MyComponent = () => (
  <ActivityIndicator animating={true} color={MD2Colors.red800} />
);

export default MyComponent;
Setting up Prettier
Setting the environment up with prettier is straightforward, just create a couple of files:
// .prettierrc
{
    "trailingComma": "es5",
    "tabWidth": 2,
    "semi": false,
    "singleQuote": true,
    "printWidth": 100,
    "endOfLine": "lf",
    "sqlKeywordCase": "lower",
    "jsxSingleQuote": true,
    "jsxBracketSameLine": false
}
// .prettierignore
.expo
node_modules
package-lock.json
docker*
These two files will vary depending on your requirements. So, feel free to play with them as your project grows.
Note: it is also important to have the Prettier VSCode extension installed and activated to this configuration works as expected.
Wrap up!
Expo is a powerful development environment that can make it easier to build and test your React Native app across different platforms.
Tailwind is a flexible and easy-to-use CSS utility library that can speed up your development process by allowing you to style your components more efficiently.
React Native Paper is a comprehensive set of UI components that can help you build a beautiful and consistent user interface.
Prettier is a code formatting tool that can help you maintain consistent formatting across your project and save you time and effort.
As your project grows and evolves, you may need to make changes to your configuration to adapt to new requirements and technologies, so it's important to stay up-to-date with the latest tools and best practices.
Bonus
This article sums up the steps I followed to create this template. You can find its repository in this link. Feel free to use it and give some feedback!
Stay tuned!